Raspberry pi weather stations

Weather station playing up has to rebuild, but found Weewx 5 has some breaking changes and world has moved on so here goes.

NB Weewx can be installed

10 Feb 2024. Weewx 5.0.2

1) Burn images Raspberry pi Legacy 32 bit lite.023-12-05 for headless operation, then install updates and Nginx.

pi@PiWeewx:~ $ sudo apt update
....
pi@PiWeewx:~ $ sudo apt full-upgrade
...
pi@PiWeewx:~ $ sudo apt remove apache2
...
pi@PiWeewx:~ $ sudo apt install nginx
...
pi@PiWeewx:~ $ sudo systemctl start nginx

### Check webserver is running.

Install Weewx. Instructions here.

# 1st time only allow apt to see weewx
sudo apt install -y wget gnupg
# NB Bug workaround: You may need to use the keys-old.html
wget -qO - https://weewx.com/keys.html | \
    sudo gpg --dearmor --output /etc/apt/trusted.gpg.d/weewx.gpg
 echo "deb [arch=all] https://weewx.com/apt/python3 buster main" | \
    sudo tee /etc/apt/sources.list.d/weewx.list

## Install Weewx 
sudo apt update
sudo apt install weewx

Install SDR extension for Weewx. This is a bit undocumented at present so some experimentation gives:.

pi@PiWeewx:~ $ sudo systemctl stop weewx
pi@PiWeewx:~ $ wget -O weewx-sdr.zip https://github.com/matthewwall/weewx-sdr/archive/master.zip
pi@PiWeewx:~ $ sudo weectl extension install weewx-sdr.zip
...
## Install drivers
pi@PiWeewx:~ $ sudo apt-get install rtl-433
...
## Free up the USB port
sudo rmmod rtl2832_sdr dvb_usb_rtl28xxu rtl2832
...
# Later you will need the Vendor ID and product ID for USB stick
# With USB stick inserted the command is lsusb -v
pi@PiWeewx:$> lsusb -v
Bus 001 Device 002: ID 0bda:2838 Realtek Semiconductor Corp. RTL2838 
DVB-T
...
idVendor 0x0bda Realtek Semiconductor Corp.
idProduct 0x2838 RTL2838 DVB-T
...
pi@PiWeewx:sudo rtl_433
_ _ _ _ _ _ _ _ _ _ _ _ _ _ _ _ _ _ _ _ _ _ _
time : 2024-02-13 16:48:08 brand : OS
model : Oregon-PCR800 House Code: 9
Channel : 0 Battery : 0 Rain Rate : 0.0 in/h
Total Rain: 6.2 in
_ _ _ _ _ _ _ _ _ _ _ _ _ _ _ _ _ _ _ _ _ _ _
time : 2024-02-13 16:48:11 brand : OS
model : Oregon-THGR810 House Code: 176
Channel : 1 Battery : 1 Celsius : 17.30 C
Humidity : 60 %
_ _ _ _ _ _ _ _ _ _ _ _ _ _ _ _ _ _ _ _ _ _ _
time : 2024-02-13 16:48:55 brand : OS
model : Oregon-PCR800 House Code: 9
Channel : 0 Battery : 0 Rain Rate : 0.0 in/h Total Rain: 6.2 in
_ _ _ _ _ _ _ _ _ _ _ _ _ _ _ _ _ _ _ _ _ _ _
time : 2024-02-13 16:49:04 brand : OS
model : Oregon-THGR810 House Code: 176
Channel : 1 Battery : 1 Celsius : 17.30 C Humidity : 60 %
_ _ _ _ _ _ _ _ _ _ _ _ _ _ _ _ _ _ _ _ _ _ _
time : 2024-02-13 16:49:42 brand : OS
model : Oregon-PCR800 House Code: 9
Channel : 0 Battery : 0 Rain Rate : 0.0 in/h Total Rain: 6.2 in
_ _ _ _ _ _ _ _ _ _ _ _ _ _ _ _ _ _ _ _ _ _ _ _
time : 2024-02-13 16:49:57 brand : OS
model : Oregon-THGR810 House Code: 176
Channel : 1 Battery : 1 Celsius : 17.30 C Humidity : 60 %

Run sdr.py to examine parsed output:

pi@PiWeewx:$ cd /etc/weewx
pi@PiWeewx:$ sudo PYTHONPATH=/usr/share/weewx python bin/user/sdr.py --cmd="rtl_433 -M utc -F json"

# If using USB stick you may need to give the user weewx permission to accesss the USB port

sudo usermod -aG plugdev weewx 

Now the BME280 drivers. First activate the I2C and spi interfaces:

     pi@PiWeewx:~ $sudo raspi-config
     # Select interface options->I2C->Yes
     # Select interface options->SPI->Yes
     # Reboot computer
     sudo reboot.

You may need to install pip, the python package installer before you can install the BME drivers.:

pi@PiWeewx:~ $ sudo apt install python3-pip


Adding sensors to a RPi weather station

In the previous posts I set up a Raspberry Pi weather station using a USB radio reciever to pickup the data direct from the sensors. Unfortunately the pressure sensor is located in the base station rather than the outdoor sensors so I cant read it. As a work around I used a BME280 temperature/pressure sensor from Pimoroni.  Although Weewx is capable of running a service to poll the sensor, I found it simplest to grab a reading from the sensor into sdr.py as the recieved packets are processed. The patch is in /usr/share/weewx/user/sdr.py. First you will need to connect up the sensor and install the drivers. I found it useful to install drivers for both Python 2 and 3. You will also need to enable the i2c inteface for the pi. See the instructions on this page. You will need to run both sudo pip install ... and sudo pip3 install.... to get both versions.

Mods to sdr.py

Near the start of sdr.py, where the imports are defined, add code to import the smbus and bme280 libraries:

...
import time
## RWS - BME280 sensor with Pimoroni library
try:
from smbus2 import SMBus
except ImportError:
from smbus import SMBus
...

After the section where various constants are added, include code to initialise the sensor:

...
DRIVER_NAME = 'SDR'

DRIVER_VERSION = '0.77'

# Initialise the BME280 in 'forced' mode
bus = SMBus(1)
bme280 = BME280(i2c_dev=bus)
bme280.setup(mode="forced")
...

Finally, locate the class that handles processing the packets for your sensor (in my case the Bresser6in1Packet.parse_json), add a line to append the sensor reading to the packet:

 @staticmethod
def parse_json(obj):
pkt = dict()
pkt['dateTime'] = Packet.parse_time(obj.get('time'))
pkt['usUnits'] = weewx.METRICWX
pkt['station_id'] = obj.get('id')
pkt['battery'] = obj.get('battery_ok')
pkt['pressure'] = bme280.get_pressure()
......

You can of course add indoor temperature and humidity if you wish.

Oregon scientific and Bresser weather gauge

January 2021

Some notes on how I set up a weather station on a Raspberry Pi zero W using Weewxsoftware, SDR (a software defined radio USB dongle), an Oregon WMR89 and a Bresser 5in1 weather station. The Oregon unit transmits on 433Mhz and is fairly standard. The Bresser unit is newer and, as a result of recent charges in their protocol needs a bit more hacking to get it working.

Antenna lengths

The usb dongle is supplied with a short whip aerial. Its not very critical, but if you need max range, here is the theory.

1/4 wave dipole best when there is an earth plane. 1/2 wave is better when there is no earth plane. Figures below dont take account of speed of light in a wire is less than in a vacuum but none of it is critical.

433Mhz - 173mm for a 1/4 wave whip
868Mhz - 86.3mm

Installation

These notes cover both the Oregon WMR89 sensors and the new version Bresser 5-in-1 weather station.

Follow these instructions to install the modules on the RPi.

https://github.com/weewx/weewx/wiki/sdr-rpi-recipe
https://github.com/weewx/weewx/wiki/sdr-rpi-recipe.

If using the Bresser sensors, make sure you install rtl_433 version 20.11 or later. Earlier versions may not parse Bresser 5in1 correctly. Most recent will handle the Oregon.

Testing rtl_433

Check radio signals being recieved and parsed by rtl_433. For the Bresser station you will need to to specify the frequency on the command line as operates at 868.2Mhz rather than the default 433Mhz for the OregonScientific. Note not all packets include temperature and humidity so be sure to examine a few!

sudo rtl_433 -F json -f 868.2M -s 1M
.....{"time" : "2021-01-15 16:14:34", "model" : "Bresser-6in1", "id" : 541070586, "channel" : 0, "battery_ok" : 1, "sensor_type" : 1, "wind_max_m_s" : 0.000, "wind_avg_m_s" : 0.000, "wind_dir_deg" : 270, "rain_mm" : 6.400, "mic" : "CRC"}

{"time" : "2021-01-15 16:14:46", "model" : "Bresser-6in1", "id" : 541070586, "channel" : 0, "battery_ok" : 1, "temperature_C" : 1.300, "humidity" : 87, "sensor_type" : 1, "wind_max_m_s" : 0.000, "wind_avg_m_s" : 0.000, "wind_dir_deg" : 270, "mic" : "CRC"}

{"time" : "2021-01-15 16:14:58", "model" : "Bresser-6in1", "id" : 541070586, "channel" : 0, "battery_ok" : 1, "sensor_type" : 1, "wind_max_m_s" : 0.000, "wind_avg_m_s" : 0.000, "wind_dir_deg" : 270, "rain_mm" : 6.400, "mic" : "CRC"}

{"time" : "2021-01-15 16:15:10", "model" : "Bresser-6in1", "id" : 541070586, "channel" : 0, "battery_ok" : 1, "temperature_C" : 1.300, "humidity" : 87, "sensor_type" : 1, "wind_max_m_s" : 0.000, "wind_avg_m_s" : 0.000, "wind_dir_deg" : 270, "mic" : "CRC"}

Modify sdr.py for Bresser

The current version of /usr/share/weewx/user/sdr.py includes code to parse the Oregon WMR89 weather station, but not the current version of the Bresser n-in1. You need to add a class to parse the output and also add it to the list of data types in class PacketFactory(). Its very similar to the Bresser 5-in-1. If you cut and paste the code you will need to tidy up the tabs and indentation.

class Bresser6in1Packet(Packet):
# Includes newer versions of 5 in 1 as well as 6 in 1 and 7 in 1.
#{"time" : "2021-01-15 16:14:58", "model" : "Bresser-6in1", "id" : 541070586, "channel" : 0, "battery_ok" : 1, "sensor_type" : 1, "wind_max_m_s" : 0.000, "wind_avg_m_s" : 0.000, "wind_dir_deg" : 270, "rain_mm" : 6.400, "mic" : "CRC"}
#{"time" : "2021-01-15 16:15:10", "model" : "Bresser-6in1", "id" : 541070586, "channel" : 0, "battery_ok" : 1, "temperature_C" : 1.300, "humidity" : 87, "sensor_type" : 1, "wind_max_m_s" : 0.000, "wind_avg_m_s" : 0.000, "wind_dir_deg" : 270, "mic" : "CRC"}

IDENTIFIER = "Bresser-6in1"
@staticmethod
def parse_json(obj):
pkt = dict()
pkt['dateTime'] = Packet.parse_time(obj.get('time'))
pkt['usUnits'] = weewx.METRICWX
pkt['station_id'] = obj.get('id')
pkt['channel'] = obj.get('channel')
pkt['battery'] = obj.get('battery_ok')
pkt['sensor_type'] = obj.get('sensor_type')
# deal with different labels from rtl_433
for dst, src in [('temperature_C', 'temperature_C'),
('humidity','humidity'),
('moisture','moisture'),
('wind_speed', 'wind_avg_m_s'),
('gust_speed', 'wind_max_m_s'),
('wind_dir_deg','wind_dir_deg'),
('rain_total', 'rainfall_mm'),
('rain_total', 'rain_mm'),
('uv','uv')]:
if src in obj:
pkt[dst] = Packet.get_float(obj,src)
return Bresser6in1Packet.insert_ids(pkt)

@staticmethod
def insert_ids(pkt):
station_id = pkt.pop('station_id', '0000')
pkt = Packet.add_identifiers(pkt, station_id, Bresser6in1Packet.__name__)
return pkt
class PacketFactory(object):
KNOWN_PACKETS = [
AcuriteAtlasPacket,
...
Bresser6in1Packet,
...

Testing sdr.py

Your command line to test sdr.py with the Bresser station at the will look like:
sudo PYTHONPATH=/usr/share/weewx python3 /usr/share/weewx/user/sdr.py --cmd="rtl_433 -M utc -F json -f 868M"
The output will look something like this:

out:['{
"time" : "2021-01-17 11:48:15",
"model" : "Bresser-6in1",
"id" : 541070586,
"channel" : 0,
"battery_ok" : 1,
"temperature_C" : 7.100,
"humidity" : 69,
"sensor_type" : 1,
"wind_max_m_s" : 3.000,
"wind_avg_m_s" : 2.900,
"wind_dir_deg" : 270,
"mic" : "CRC"
}\n']

parsed: {
'dateTime': 1610884095, 'usUnits': 17,
'battery.541070586.Bresser6in1Packet': 1,
'temperature_C.541070586.Bresser6in1Packet': 7.1,
'humidity.541070586.Bresser6in1Packet': 69.0,
'wind_speed.541070586.Bresser6in1Packet': 2.9,
'gust_speed.541070586.Bresser6in1Packet': 3.0,
'wind_dir_deg.541070586.Bresser6in1Packet': 270.0
}

You can now edit weewx.conf to suit. Its located in

/etc/weewx/weewx.conf

Here is my section for SDR. Commands for the Oregon WMR89 are commented out.

[SDR]
# This section is for the software-defined radio driver.

# The driver to use
driver = user.sdr
#cmd = rtl_433 -M utc -F json
cmd = rtl_433 -M utc -F json -f868.2M
path = /usr/local/bin/
log_unknown_sensors = True
log_unmapped_sensors = True

[[sensor_map]]
# Oregon WMR89
# windSpeed = wind_speed.0:215.OSWGR800Packet
# windGust = wind_gust.0:215.OSWGR800Packet
# windDir = wind_dir.0:215.OSWGR800Packet
# windBatteryStatus = battery.0:215.OSWGR800Packet
# outTemp = temperature.1:246.OSTHGR810Packet
# outHumidity = humidity.1:246.OSTHGR810Packet
# outTempBatteryStatus = battery.1:246.OSTHGR810Packet
# pressure = pressure.1:246.OSTHGR810Packet
# rainBatteryStatus = battery.0:122.OSPCR800Packet
# rainRate = rain_rate.0:122.OSPCR800Packet
# rain_total = rain.0:122.OSPCR800Packet

# Bresser 5in1 (new format)
windSpeed = wind_speed.541070586.Bresser6in1Packet
windGust = gust_speed.541070586.Bresser6in1Packet
windDir = wind_dir_deg.541070586.Bresser6in1Packet
outTemp = temperature_C.541070586.Bresser6in1Packet
outHumidity = humidity.541070586.Bresser6in1Packet
pressure = pressure.541070586.Bresser6in1Packet

[[deltas]]
rain = rain_total

Finishing Up

Finally, the default web page does not autorefresh. To make it easier to reload the page I made the station name in the masthead into a link to auto refresh script. Its like old school tapping a barometer to see if the pressure is falling. Although a lot can be configured through weewx.conf, this change has to be made in the skin. The default is located in /etc/weewx/skins/Seasons. The page index.html.tmpl calls  titlebar.inc to build the masthead. Wrapping a <a> element with some javascript around the relevant div gives the wanted effect:

....
<div id="title_bar">

<a HREF="javascript:history.go(0)">
<div id="title">
<h1 class="page_title">$station.location</h1>
<p class="lastupdate">$current.dateTime</p>
</div>
</a>
....

Setting up a headless Raspberry Pi.

I’m using a Pi Zero. These instructions show how to set it up without needing to connect a monitor or keyboard.

Configure the RPI

      1. On a Windows PC, use the RP imager software to format the SD card and burn an image. This will create two partitions on the card. One (called ‘Recovery’) can be browsed with Windows. The second partition cant be read with Windows. Leave it alone.
        https://www.raspberrypi.org/downloads/
      2. On Windows, using Notepad++, create a “wpa_supplicant.conf” file. This contains details of your WiFi network. It should be saved as a Unix file and copied to the root folder of the Recovery partition.
        network={
          ssid="my network name"
          psk="my network password"
          proto=RSN
          key_mgmt=WPA-PSK
          pairwise=CCMP
          auth_alg=OPEN
        }
      3. Create an empty file called “ssh.txt” and copy this to the root folder of the Recovery partition. This is a security precaution and tells the RP to enable SSH when it boots. Its not normally enabled as doing so without a password is a security risk.
      4. On your PC install ‘Putty’. This is a simple GUI that gives command line access to the RP and allows setup to continue.:
        https://www.chiark.greenend.org.uk/~sgtatham/putty/latest.html
      5. Install the SD card in the Raspberry Pi and then, on your Windows box, use a browser to connect to your router and the IP address for the Pi.
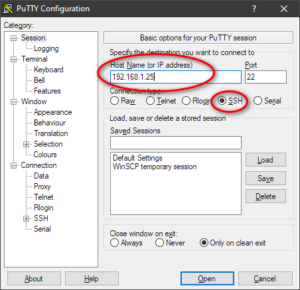
      6. Start Putty and connect to the Raspberry Pi via SSH:
      7. A console window will open with the Raspberry Pi. Login – the default username/password is pi/raspberry. You will change this in a few minutes.

Editing system files on the  RPi

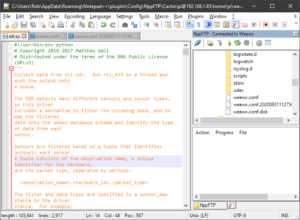
Putty will give you a quick and easy command line tool and you can use an editor like nano or vi, its much easier with a GUI editor. My preferred tool is to run Notepad++ with the NppFTP plugin. This gives you a tree view of the file system. Double click a file and it gets transferred to your workstation and opened in the editor. When you save it, it gets copied to the RPI ready to test via Putty’s console window.

    1. There is only one gotcha, the file protection some of the files you install may prevent you editing them as they may be owned by root, rather than yourself. Use sudo chmod o+w file.name to make them editable. In the case of Weewx you can recurse the file system using find to fix all relevant files. This should do the trick. It only needs to be done once.
      sudo su
      find /etc/weewx -exec chmod o+w {} \;
      find /var/www/html -exec chmod o+w {} \;

      GUI interface

    2. If you prefer, you can use a GUI interface to the RPi desktop.
      1. On your PC install Real VNC Viewer from:
        https://www.realvnc.com/en/connect/download/viewer/.
      2. Open a console window via Putty. Once logged on type: sudo raspi-config. This starts a simple menu system. Under ‘Interfaces’ enable VNC.
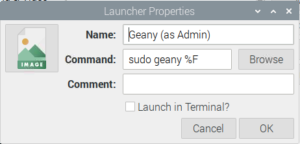
      3. You can now reboot the Raspberry Pi and connect via VNC to get a graphical interface. When you connect for the first time you will be prompted to change the password. I also change the screen resolution to 1280 x 720 and create a menu entry for the Geany editor running as admin: