I’m using a Pi Zero. These instructions show how to set it up without needing to connect a monitor or keyboard.
Configure the RPI
-
-
- On a Windows PC, use the RP imager software to format the SD card and burn an image. This will create two partitions on the card. One (called ‘Recovery’) can be browsed with Windows. The second partition cant be read with Windows. Leave it alone.
https://www.raspberrypi.org/downloads/
- On Windows, using Notepad++, create a “wpa_supplicant.conf” file. This contains details of your WiFi network. It should be saved as a Unix file and copied to the root folder of the Recovery partition.
network={ ssid="my network name" psk="my network password" proto=RSN key_mgmt=WPA-PSK pairwise=CCMP auth_alg=OPEN } - Create an empty file called “ssh.txt” and copy this to the root folder of the Recovery partition. This is a security precaution and tells the RP to enable SSH when it boots. Its not normally enabled as doing so without a password is a security risk.
- On your PC install ‘Putty’. This is a simple GUI that gives command line access to the RP and allows setup to continue.:
https://www.chiark.greenend.org.uk/~sgtatham/putty/latest.html - Install the SD card in the Raspberry Pi and then, on your Windows box, use a browser to connect to your router and the IP address for the Pi.
- Start Putty and connect to the Raspberry Pi via SSH:
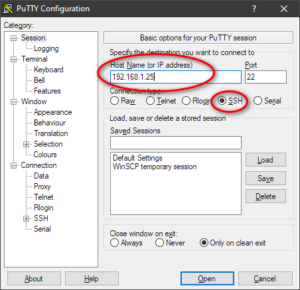
- A console window will open with the Raspberry Pi. Login – the default username/password is pi/raspberry. You will change this in a few minutes.
- On a Windows PC, use the RP imager software to format the SD card and burn an image. This will create two partitions on the card. One (called ‘Recovery’) can be browsed with Windows. The second partition cant be read with Windows. Leave it alone.
-
Editing system files on the RPi
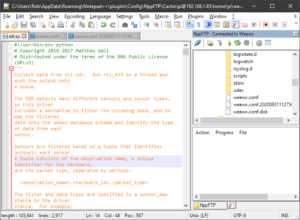
Putty will give you a quick and easy command line tool and you can use an editor like nano or vi, its much easier with a GUI editor. My preferred tool is to run Notepad++ with the NppFTP plugin. This gives you a tree view of the file system. Double click a file and it gets transferred to your workstation and opened in the editor. When you save it, it gets copied to the RPI ready to test via Putty’s console window.
-
- There is only one gotcha, the file protection some of the files you install may prevent you editing them as they may be owned by root, rather than yourself. Use
sudo chmod o+w file.nameto make them editable. In the case of Weewx you can recurse the file system using find to fix all relevant files. This should do the trick. It only needs to be done once.sudo su find /etc/weewx -exec chmod o+w {} \; find /var/www/html -exec chmod o+w {} \;GUI interface
- If you prefer, you can use a GUI interface to the RPi desktop.
- On your PC install Real VNC Viewer from:
https://www.realvnc.com/en/connect/download/viewer/. - Open a console window via Putty. Once logged on type:
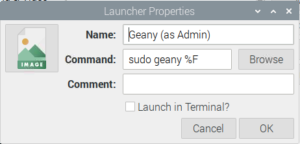
sudo raspi-config. This starts a simple menu system. Under ‘Interfaces’ enable VNC. - You can now reboot the Raspberry Pi and connect via VNC to get a graphical interface. When you connect for the first time you will be prompted to change the password. I also change the screen resolution to 1280 x 720 and create a menu entry for the Geany editor running as admin:
- On your PC install Real VNC Viewer from:
- There is only one gotcha, the file protection some of the files you install may prevent you editing them as they may be owned by root, rather than yourself. Use