Raspberry pi weather stations

Weather station playing up has to rebuild, but found Weewx 5 has some breaking changes and world has moved on so here goes.

NB Weewx can be installed

10 Feb 2024. Weewx 5.0.2

1) Burn images Raspberry pi Legacy 32 bit lite.023-12-05 for headless operation, then install updates and Nginx.

pi@PiWeewx:~ $ sudo apt update
....
pi@PiWeewx:~ $ sudo apt full-upgrade
...
pi@PiWeewx:~ $ sudo apt remove apache2
...
pi@PiWeewx:~ $ sudo apt install nginx
...
pi@PiWeewx:~ $ sudo systemctl start nginx

### Check webserver is running.

Install Weewx. Instructions here.

# 1st time only allow apt to see weewx
sudo apt install -y wget gnupg
# NB Bug workaround: You may need to use the keys-old.html
wget -qO - https://weewx.com/keys.html | \
    sudo gpg --dearmor --output /etc/apt/trusted.gpg.d/weewx.gpg
 echo "deb [arch=all] https://weewx.com/apt/python3 buster main" | \
    sudo tee /etc/apt/sources.list.d/weewx.list

## Install Weewx 
sudo apt update
sudo apt install weewx

Install SDR extension for Weewx. This is a bit undocumented at present so some experimentation gives:.

pi@PiWeewx:~ $ sudo systemctl stop weewx
pi@PiWeewx:~ $ wget -O weewx-sdr.zip https://github.com/matthewwall/weewx-sdr/archive/master.zip
pi@PiWeewx:~ $ sudo weectl extension install weewx-sdr.zip
...
## Install drivers
pi@PiWeewx:~ $ sudo apt-get install rtl-433
...
## Free up the USB port
sudo rmmod rtl2832_sdr dvb_usb_rtl28xxu rtl2832
...
# Later you will need the Vendor ID and product ID for USB stick
# With USB stick inserted the command is lsusb -v
pi@PiWeewx:$> lsusb -v
Bus 001 Device 002: ID 0bda:2838 Realtek Semiconductor Corp. RTL2838 
DVB-T
...
idVendor 0x0bda Realtek Semiconductor Corp.
idProduct 0x2838 RTL2838 DVB-T
...
pi@PiWeewx:sudo rtl_433
_ _ _ _ _ _ _ _ _ _ _ _ _ _ _ _ _ _ _ _ _ _ _
time : 2024-02-13 16:48:08 brand : OS
model : Oregon-PCR800 House Code: 9
Channel : 0 Battery : 0 Rain Rate : 0.0 in/h
Total Rain: 6.2 in
_ _ _ _ _ _ _ _ _ _ _ _ _ _ _ _ _ _ _ _ _ _ _
time : 2024-02-13 16:48:11 brand : OS
model : Oregon-THGR810 House Code: 176
Channel : 1 Battery : 1 Celsius : 17.30 C
Humidity : 60 %
_ _ _ _ _ _ _ _ _ _ _ _ _ _ _ _ _ _ _ _ _ _ _
time : 2024-02-13 16:48:55 brand : OS
model : Oregon-PCR800 House Code: 9
Channel : 0 Battery : 0 Rain Rate : 0.0 in/h Total Rain: 6.2 in
_ _ _ _ _ _ _ _ _ _ _ _ _ _ _ _ _ _ _ _ _ _ _
time : 2024-02-13 16:49:04 brand : OS
model : Oregon-THGR810 House Code: 176
Channel : 1 Battery : 1 Celsius : 17.30 C Humidity : 60 %
_ _ _ _ _ _ _ _ _ _ _ _ _ _ _ _ _ _ _ _ _ _ _
time : 2024-02-13 16:49:42 brand : OS
model : Oregon-PCR800 House Code: 9
Channel : 0 Battery : 0 Rain Rate : 0.0 in/h Total Rain: 6.2 in
_ _ _ _ _ _ _ _ _ _ _ _ _ _ _ _ _ _ _ _ _ _ _ _
time : 2024-02-13 16:49:57 brand : OS
model : Oregon-THGR810 House Code: 176
Channel : 1 Battery : 1 Celsius : 17.30 C Humidity : 60 %

Run sdr.py to examine parsed output:

pi@PiWeewx:$ cd /etc/weewx
pi@PiWeewx:$ sudo PYTHONPATH=/usr/share/weewx python bin/user/sdr.py --cmd="rtl_433 -M utc -F json"

# If using USB stick you may need to give the user weewx permission to accesss the USB port

sudo usermod -aG plugdev weewx 

Now the BME280 drivers. First activate the I2C and spi interfaces:

     pi@PiWeewx:~ $sudo raspi-config
     # Select interface options->I2C->Yes
     # Select interface options->SPI->Yes
     # Reboot computer
     sudo reboot.

You may need to install pip, the python package installer before you can install the BME drivers.:

pi@PiWeewx:~ $ sudo apt install python3-pip


Hacking the Mopidy music player.

We will use the following hardware:

Need to check what pins are in use by various boards from pinout.xyz.

#02 5Vpower
#12 GPIO 18 I2S
#18 GPIO 24 Button (not needed)
#19 GPIO 10 LCD SPI Data
#22 GPIO 25 Amplifier enable
#23 GP10 11 LCD SPI (not needed)
#29 GPIO 7  LCD SPI CS (not needed)
#29 GPIO 5 Button A (not needed)
#31 GPIO 6 Button B (not needed)
#33 GPIO13  LCD Backlight (not needed)
#35 GPIO 19 I2S
#36 GPIO 16 Button X
#38 GPIO 20 Button Y Obsolete
#39 GPIO 21 I2S

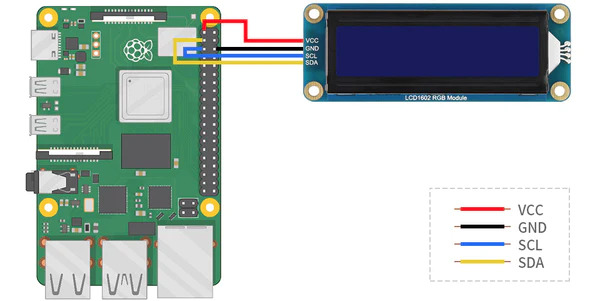
For the 16 x 2 display we need power and the I2C interface. This can support more than one device, so no problems. Here are the connections

#01 +3.3V Power #03 GP1O 02 SCL #05 GP1O 05 SCL #09 GRND Ground

Raspberry Pi Zero wireless, Version 2Pirate audio amplifierWaveshare LCD1602 displayBreakout board for Pi ZeroHardware & speakers from Pure Chronos CD player

Raspberry Pi Zero wireless, Version 2Pirate audio amplifierWaveshare LCD1602 displayBreakout board for Pi ZeroHardware & speakers from Pure Chronos CD player

Experiments with the display

Remove Pirate Audio board.

Make a Development ENvironment

We will be using virtualenvwrapper to create a workspace in a a virtual environment when working on mopidy. This isolates anything we do from the normal python environment. First of all make sure modpidy is not running:

sudo systemctl stop mopidy

Now install virtualenvwrapper software:

sudo pip install virtualenvwrapper

To complete the install you will need to edit your .bashrc file and reload it to add the definitions to your default environment.

nano ~/.bashrc
# Add these 3 lines at the end of .bashrc and save
    export WORKON_HOME=~/Envs
    mkdir -p $WORKON_HOME
    source /usr/local/bin/virtualenvwrapper.sh

Finally, ‘source’ the file to load the definitions to your environment (or reboot):

source ~/.bashrc

Useful commands when working with virttualenvwrapper are:

Create an environment for working on mopidy

You are now ready to create your environment for working on mopidy. You need to create a directory to work in and check which version of python you are running with and where it is located. Start looking under /usr/bin/ . In my case its python 3.9

# Determine which version of Python you are running:
ls /usr/bin/python*
/usr/bin/python   /usr/bin/python3.9         /usr/bin/python3-config
/usr/bin/python3  /usr/bin/python3.9-config

# Create the virtual environment
mkdir ~/mopidy_dev
cd modpidy_dev
mkvirtualenv -a ~/mopidy_dev --python $(which python3.9) \
          --system-site-packages mopidy

You are now ready to start installing software into your virtual environment.

Setup & Test Pirate AUdio

On Windows PC, use the Raspberry Pi imager to burn image to MicroSd card. We need to set it up for ‘headless’ operation so, in the settings cog set the following:

  • Set hostname
  • Enable SSH
  • Set default username and password
  • Configure Wireless LAN

Note first boot takes some time because it has to arrange the file system and do other housekeeping. Reboot and then install Pirate Audio using these instructions. This makes the nessesary changes to config.txt and installs a number of useful extensions such as:

  • Mopidy – The core component for the system
  • Mopdi-PiDi display driver (we wont be using this in the final system, but its useful for testing and hacking to provide a driver for the 16 x 2 display).
  • Mopidy-Iris – Web based UI for driving the player from another computer
  • Mopidy-Raspberry-GPIO – We will be replacing this with a hacked version of Mopidy-Headless when we come to implement the controls based on the Pure Chronois hardware.

The core Mopidy installer also installs the following bundled extensions:

  • Mopidy-File
  • Mopidy-M3U
  • Mopidy-Stream
  • Mopidy-HTTP
  • Mopidy-SoftwareMixer

Here we use the Pirate Audio installer to setup Mopidy and various utilities so we can do a simple test of the system.

git clone https://github.com/pimoroni/pirate-audio
cd pirate-audio/mopidy
sudo ./install.sh
...

Use WinSCP to copy come music to your ~/Music folder. Instruct Mopidy to index the music folders.

sudo mopidyctl local scan

Reboot the system and test the installation. Using the browser on your PC, connect to iris on the RP and play some music:

http://192.168.1.20:6680/iris/

Be sure to check out /etc/mopidy/mopidy.conf. This file contains the confuration used by mopidy. The pirate audio installer configures this to define which modules load, which actions the GPIO pins implement and where the mucic folder is located. Consult the detiled documentation to see how other configurations can be achieved.

The following copmmands can be used to start/stop the Modidy service from running. See also other commands to control Mopidy:

sudo systemctl enable mopidy
sudo systemctl start mopidy
sudo systemctl stop mopidy
sudo systemctl restart mopidy 
sudo systemctl status mopidy   # Displays status & log info
mopidy --help

See this page for instructions on running mopidy from a terminal.

Populate workspace for use with Mopidy

First use the virtualenv command workon mopidy to switch to your development workspace and then clone a copy of mopidy sources from GitHub. Use the git branch command to check you are on a development branch. Finally cd to the mopidy folder and use the install script. NB There is no need to ‘sudo’ the commands this time as you are working in your own home directory.

sudo systemctl stop mopidy
..
workon mopidy
pwd
/home/pi/mopidy_dev
git clone https://github.com/mopidy/mopidy.git
...
cd ~/mopidy-dev/mopidy/
pwd
/home/pi/mopidy_dev/mopidy
...
git branch
* develop
pip install --upgrade --editable .

Next we’ll want to run Mopidy from the Git repo. There’s two reasons for this: first of all, it lets you easily change the source code, restart Mopidy, and see the change take effect. Second, it’s a convenient way to keep at the bleeding edge, testing the latest developments in Mopidy itself or test some extension against the latest Mopidy changes.

Assuming you’re still inside the Git repo, use pip to install Mopidy from the Git repo in an “editable” form:

pip install --upgrade --editable .

If the above command fails with AttributeError: install_layout please refer to #2037 . Try using:

export SETUPTOOLS_USE_DISTUTILS=stdlib
pip install --upgrade --editable .

You now have an editable version of mopidy you can tinker with. You may like to test it by starting from the command line with the mopidy or mopidy--verbose option to see the full gory detail, or omit to see the shorter information (including which config file it is using).

mopidy
INFO     2022-07-19 16:29:58,577 [1632:MainThread] mopidy.__main__
  Starting Mopidy 3.3.0
INFO     2022-07-19 16:30:01,056 [1632:MainThread] mopidy.config
  Loading config from builtin defaults
INFO     2022-07-19 16:30:01,147 [1632:MainThread] mopidy.config
  Loading config from file:///home/pi/.config/mopidy/mopidy.conf
INFO     2022-07-19 16:30:01,170 [1632:MainThread] mopidy.config
  Loading config from command line options
INFO     2022-07-19 16:30:05,417 [1632:MainThread] mopidy.__main__
  Enabled extensions: iris, m3u, softwaremixer, http, pidi, file, local, stream
INFO     2022-07-19 16:30:05,421 [1632:MainThread] mopidy.__main__
  Disabled extensions: spotify, raspberry-gpio
WARNING  2022-07-19 16:30:05,428 [1632:MainThread] mopidy.__main__
  Found spotify configuration errors. The extension has been automatically disabled:
WARNING  2022-07-19 16:30:05,435 [1632:MainThread] mopidy.__main__
    spotify/username must be set.
WARNING  2022-07-19 16:30:05,440 [1632:MainThread] mopidy.__main__
    spotify/password must be set.
WARNING  2022-07-19 16:30:05,445 [1632:MainThread] mopidy.__main__
    spotify/client_id must be set.
WARNING  2022-07-19 16:30:05,451 [1632:MainThread] mopidy.__main__
    spotify/client_secret must be set.
WARNING  2022-07-19 16:30:05,458 [1632:MainThread] mopidy.__main__
  Please fix the extension configuration errors or disable the extensions to silence these messages.
INFO     2022-07-19 16:30:07,010 [1632:MainThread] mopidy.commands
  Starting Mopidy mixer: SoftwareMixer
INFO     2022-07-19 16:30:07,037 [1632:MainThread] mopidy.commands
  Starting Mopidy audio
INFO     2022-07-19 16:30:07,076 [1632:MainThread] mopidy.commands
  Starting Mopidy backends: LocalBackend, FileBackend, M3UBackend, StreamBackend
INFO     2022-07-19 16:30:07,225 [1632:Audio-2] mopidy.audio.actor
  Audio output set to "autoaudiosink"
INFO     2022-07-19 16:30:07,565 [1632:MainThread] mopidy.commands
  Starting Mopidy core
INFO     2022-07-19 16:30:07,715 [1632:MainThread] mopidy.commands
  Starting Mopidy frontends: PiDiFrontend, IrisFrontend, HttpFrontend
INFO     2022-07-19 16:30:07,743 [1632:IrisFrontend-9] mopidy_iris.core
  Starting Iris 3.64.0
INFO     2022-07-19 16:30:07,787 [1632:HttpFrontend-11] mopidy.http.actor
  HTTP server running at [::ffff:127.0.0.1]:6680
INFO     2022-07-19 16:30:07,791 [1632:MainThread] mopidy.commands
  Starting GLib mainloop

You will need to use Ctrl+C to stop it running.

Connect up display:

On your PC, download the Waveshare demo code and extract. Then copy across to the RPi to ~/LCD1602/. You will need to enable the I2C interface on the RPi:

sudo raspi-config
# Then Choose Interfacing Options -> I2C -> Yes  to enable I2C interface

You can now test the display by running one of the demo programs:

python Choose_Color.py 

Note the module RGB1602.py will need to be included in your programs.

Download the demo code from 
cd ~
wget https://www.waveshare.com/wiki/File:LCD1602-RGB-Module-demo.zip
cd ~/LCD1602-RGB-Module-demo/Raspberry
sudo chmod 777 *
sudo python Choose_Color.py 
sudo python Discoloration.py 

IR detection with Raspberry Pi

Previous post showed how I stripped down a Pure Chronos CD/Radio and showed how the various buttons on the chassis were transmitted to the motherboard as a pseudo IR signal. Now its time to decode the signal on the Raspberry PI.

This article seems to be reasonably up to date:

https://www.digikey.co.uk/en/maker/blogs/2021/how-to-send-and-receive-ir-signals-with-a-raspberry-pi

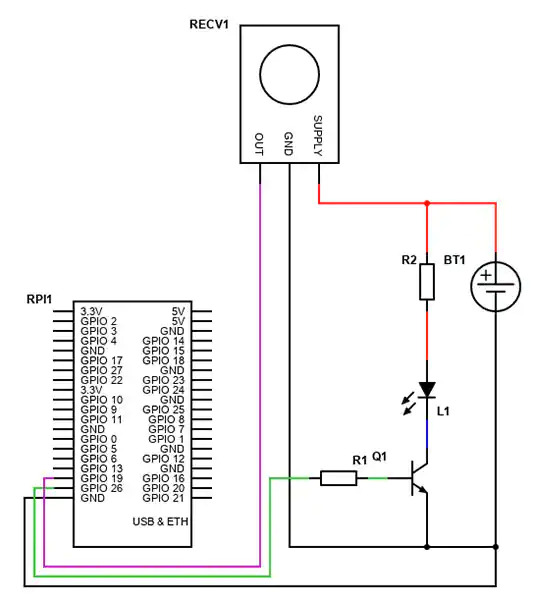
Here is the circuit they use:

First step is to edit /boot/config.txt to specify the IO pins I am reading IR signal on GPIO pin 19.

dtoverlay=gpio-ir,gpio_pin=19 # for receiving data
##dtoverlay=gpio-ir-tx,gpio_pin=26 # for sending commands

Reboot:

sudo reboot now

Install some helper libraries:

sudo apt update
sudo apt install ir-keytable

Test:
This command will read IR reciever and print parsed commands.

sudo ir-keytable -c -p all -t

Investigate if this fails when you send some signals. After fixing incorrect wiring, I get something like this:

pi@raspberrypiMP3:~ $ sudo ir-keytable -c -p all -t
Old keytable cleared
Protocols changed to unknown other lirc rc-5 rc-5-sz jvc sony nec sanyo mce_kbd rc-6 sharp xmp cec imon rc-mm
Loaded BPF protocol xbox-dvd
Testing events. Please, press CTRL-C to abort.
246.860112: lirc protocol(nec): scancode = 0x8099
246.860168: event type EV_MSC(0x04): scancode = 0x8099
246.860168: event type EV_SYN(0x00).
246.920145: lirc protocol(nec): scancode = 0x8099 repeat
246.920207: event type EV_MSC(0x04): scancode = 0x8099

Yea, I can now read the various button presses from the Chronos chassis and read them with the RP. I could go further ans install the main lirc library, but enough for now. Time to reassemble the hardware and try to hack the music player software. Not sure if I will require LIRC as I dont need to translate the keycodes, but it may be helpful to get the data into the player software.

Install lirc for the main library:

sudo apt install lirc


Edit the configuration file so set the sensor up as a device:

sudo nano /etc/lirc/lirc_options.conf
... and add...
driver = default
device = /dev/lirc0

Reboot and test:

sudo systemctl stop lircd.service
sudo mode2 -d /dev/lirc0

… and so it goes on…

Adding sensors to a RPi weather station

In the previous posts I set up a Raspberry Pi weather station using a USB radio reciever to pickup the data direct from the sensors. Unfortunately the pressure sensor is located in the base station rather than the outdoor sensors so I cant read it. As a work around I used a BME280 temperature/pressure sensor from Pimoroni.  Although Weewx is capable of running a service to poll the sensor, I found it simplest to grab a reading from the sensor into sdr.py as the recieved packets are processed. The patch is in /usr/share/weewx/user/sdr.py. First you will need to connect up the sensor and install the drivers. I found it useful to install drivers for both Python 2 and 3. You will also need to enable the i2c inteface for the pi. See the instructions on this page. You will need to run both sudo pip install ... and sudo pip3 install.... to get both versions.

Mods to sdr.py

Near the start of sdr.py, where the imports are defined, add code to import the smbus and bme280 libraries:

...
import time
## RWS - BME280 sensor with Pimoroni library
try:
from smbus2 import SMBus
except ImportError:
from smbus import SMBus
...

After the section where various constants are added, include code to initialise the sensor:

...
DRIVER_NAME = 'SDR'

DRIVER_VERSION = '0.77'

# Initialise the BME280 in 'forced' mode
bus = SMBus(1)
bme280 = BME280(i2c_dev=bus)
bme280.setup(mode="forced")
...

Finally, locate the class that handles processing the packets for your sensor (in my case the Bresser6in1Packet.parse_json), add a line to append the sensor reading to the packet:

 @staticmethod
def parse_json(obj):
pkt = dict()
pkt['dateTime'] = Packet.parse_time(obj.get('time'))
pkt['usUnits'] = weewx.METRICWX
pkt['station_id'] = obj.get('id')
pkt['battery'] = obj.get('battery_ok')
pkt['pressure'] = bme280.get_pressure()
......

You can of course add indoor temperature and humidity if you wish.

Raspberry pi Cheat Sheet

Unix cheat sheet.

See https://ss64.com/bash/ for a more comprehensive listing.

pwd
Display the name of the current working directory.
ls
List the content of the current directory.
ls [path]
List the content of the specified directory.
ls -l
List the content of the current directory with additional information.
ls -a
List all files including hidden files beginning with ‘.’ (i.e. dotfiles).
cd [path]
Change the current directory to [path].
cd ..
Change to parent directory (note the space between ‘cd’ and ‘..’).
cd /
Change to root directory (note the space between ‘cd’ and ‘/’).
cd ~
Change to home directory (determined by $HOME environment variable).
mkdir [name]
Create the directory [name] in the current working directory.
rmdir [name]
Remove the empty directory [name] from the current working directory.
rm [name]
Remove the specified file.
rm *
Remove all the files from the current working directory.
rm -r *
Remove all the files and directories from the current working directory.
cp [from] [to]
Copy a file from source [from] to destination [to].
cp -r [from] [to]
Copy everything including directories from source [from] to destination [to].
mv [from] [to]
Move a file from source [from] to destination [to].
mv -r [from] [to]
Move everything including directories from source [from] to destination [to].
find
Search for files matching certain patterns.
sudo [command]
Superuser do. Execute [command] with elevated privileges. Allows you to do things you are not entitled to. Common examples include:
​sudo raspi-config
Launch the Raspberry Pi configuration tool.
sudo reboot
Safely restart your system.
sudo shutdown -h now
Safely shutdown your system now.
sudo apt-get ​install [package]
Install a package.
sudo apt-get update
Update the list of packages without installing anything.
sudo apt-get upgrade
Upgrade the installed packages to the versions obtained with ‘apt-get update’
sudo ​chown pi:root [name]
Change the owner of [name] to ‘pi’ and set the group to ‘root’.
sudo su
Become Superuser for more than one command.
sudo ku
Undocumented.
cat [name]
Show the contents of a file.
head [name]
Show the beginning of a file.
tail [name]
Show the end of a file.
chmod [who][+,-,=][permissions] [name]
Change the permissions for a file.
chmod u+x [name]
Add execute permission for the owner of the file. Run the file with ./filename
chmod 777 [name]
Allow every user to read, write and execute the file [name].
tar -cvzf [name] [path]
Create compressed file [name] from the contents in [path].
tar -xvzf [name]
Extract the contents of a compressed file.
wget [uri]
Download a file from the Internet.
man [command]
Show the manual page for a command.
man man
View the manual page of the ‘man’ command.
grep ‘string’ [name]
Search inside one or more files for occurrences of ‘string’.

Oregon scientific and Bresser weather gauge

January 2021

Some notes on how I set up a weather station on a Raspberry Pi zero W using Weewxsoftware, SDR (a software defined radio USB dongle), an Oregon WMR89 and a Bresser 5in1 weather station. The Oregon unit transmits on 433Mhz and is fairly standard. The Bresser unit is newer and, as a result of recent charges in their protocol needs a bit more hacking to get it working.

Antenna lengths

The usb dongle is supplied with a short whip aerial. Its not very critical, but if you need max range, here is the theory.

1/4 wave dipole best when there is an earth plane. 1/2 wave is better when there is no earth plane. Figures below dont take account of speed of light in a wire is less than in a vacuum but none of it is critical.

433Mhz - 173mm for a 1/4 wave whip
868Mhz - 86.3mm

Installation

These notes cover both the Oregon WMR89 sensors and the new version Bresser 5-in-1 weather station.

Follow these instructions to install the modules on the RPi.

https://github.com/weewx/weewx/wiki/sdr-rpi-recipe
https://github.com/weewx/weewx/wiki/sdr-rpi-recipe.

If using the Bresser sensors, make sure you install rtl_433 version 20.11 or later. Earlier versions may not parse Bresser 5in1 correctly. Most recent will handle the Oregon.

Testing rtl_433

Check radio signals being recieved and parsed by rtl_433. For the Bresser station you will need to to specify the frequency on the command line as operates at 868.2Mhz rather than the default 433Mhz for the OregonScientific. Note not all packets include temperature and humidity so be sure to examine a few!

sudo rtl_433 -F json -f 868.2M -s 1M
.....{"time" : "2021-01-15 16:14:34", "model" : "Bresser-6in1", "id" : 541070586, "channel" : 0, "battery_ok" : 1, "sensor_type" : 1, "wind_max_m_s" : 0.000, "wind_avg_m_s" : 0.000, "wind_dir_deg" : 270, "rain_mm" : 6.400, "mic" : "CRC"}

{"time" : "2021-01-15 16:14:46", "model" : "Bresser-6in1", "id" : 541070586, "channel" : 0, "battery_ok" : 1, "temperature_C" : 1.300, "humidity" : 87, "sensor_type" : 1, "wind_max_m_s" : 0.000, "wind_avg_m_s" : 0.000, "wind_dir_deg" : 270, "mic" : "CRC"}

{"time" : "2021-01-15 16:14:58", "model" : "Bresser-6in1", "id" : 541070586, "channel" : 0, "battery_ok" : 1, "sensor_type" : 1, "wind_max_m_s" : 0.000, "wind_avg_m_s" : 0.000, "wind_dir_deg" : 270, "rain_mm" : 6.400, "mic" : "CRC"}

{"time" : "2021-01-15 16:15:10", "model" : "Bresser-6in1", "id" : 541070586, "channel" : 0, "battery_ok" : 1, "temperature_C" : 1.300, "humidity" : 87, "sensor_type" : 1, "wind_max_m_s" : 0.000, "wind_avg_m_s" : 0.000, "wind_dir_deg" : 270, "mic" : "CRC"}

Modify sdr.py for Bresser

The current version of /usr/share/weewx/user/sdr.py includes code to parse the Oregon WMR89 weather station, but not the current version of the Bresser n-in1. You need to add a class to parse the output and also add it to the list of data types in class PacketFactory(). Its very similar to the Bresser 5-in-1. If you cut and paste the code you will need to tidy up the tabs and indentation.

class Bresser6in1Packet(Packet):
# Includes newer versions of 5 in 1 as well as 6 in 1 and 7 in 1.
#{"time" : "2021-01-15 16:14:58", "model" : "Bresser-6in1", "id" : 541070586, "channel" : 0, "battery_ok" : 1, "sensor_type" : 1, "wind_max_m_s" : 0.000, "wind_avg_m_s" : 0.000, "wind_dir_deg" : 270, "rain_mm" : 6.400, "mic" : "CRC"}
#{"time" : "2021-01-15 16:15:10", "model" : "Bresser-6in1", "id" : 541070586, "channel" : 0, "battery_ok" : 1, "temperature_C" : 1.300, "humidity" : 87, "sensor_type" : 1, "wind_max_m_s" : 0.000, "wind_avg_m_s" : 0.000, "wind_dir_deg" : 270, "mic" : "CRC"}

IDENTIFIER = "Bresser-6in1"
@staticmethod
def parse_json(obj):
pkt = dict()
pkt['dateTime'] = Packet.parse_time(obj.get('time'))
pkt['usUnits'] = weewx.METRICWX
pkt['station_id'] = obj.get('id')
pkt['channel'] = obj.get('channel')
pkt['battery'] = obj.get('battery_ok')
pkt['sensor_type'] = obj.get('sensor_type')
# deal with different labels from rtl_433
for dst, src in [('temperature_C', 'temperature_C'),
('humidity','humidity'),
('moisture','moisture'),
('wind_speed', 'wind_avg_m_s'),
('gust_speed', 'wind_max_m_s'),
('wind_dir_deg','wind_dir_deg'),
('rain_total', 'rainfall_mm'),
('rain_total', 'rain_mm'),
('uv','uv')]:
if src in obj:
pkt[dst] = Packet.get_float(obj,src)
return Bresser6in1Packet.insert_ids(pkt)

@staticmethod
def insert_ids(pkt):
station_id = pkt.pop('station_id', '0000')
pkt = Packet.add_identifiers(pkt, station_id, Bresser6in1Packet.__name__)
return pkt
class PacketFactory(object):
KNOWN_PACKETS = [
AcuriteAtlasPacket,
...
Bresser6in1Packet,
...

Testing sdr.py

Your command line to test sdr.py with the Bresser station at the will look like:
sudo PYTHONPATH=/usr/share/weewx python3 /usr/share/weewx/user/sdr.py --cmd="rtl_433 -M utc -F json -f 868M"
The output will look something like this:

out:['{
"time" : "2021-01-17 11:48:15",
"model" : "Bresser-6in1",
"id" : 541070586,
"channel" : 0,
"battery_ok" : 1,
"temperature_C" : 7.100,
"humidity" : 69,
"sensor_type" : 1,
"wind_max_m_s" : 3.000,
"wind_avg_m_s" : 2.900,
"wind_dir_deg" : 270,
"mic" : "CRC"
}\n']

parsed: {
'dateTime': 1610884095, 'usUnits': 17,
'battery.541070586.Bresser6in1Packet': 1,
'temperature_C.541070586.Bresser6in1Packet': 7.1,
'humidity.541070586.Bresser6in1Packet': 69.0,
'wind_speed.541070586.Bresser6in1Packet': 2.9,
'gust_speed.541070586.Bresser6in1Packet': 3.0,
'wind_dir_deg.541070586.Bresser6in1Packet': 270.0
}

You can now edit weewx.conf to suit. Its located in

/etc/weewx/weewx.conf

Here is my section for SDR. Commands for the Oregon WMR89 are commented out.

[SDR]
# This section is for the software-defined radio driver.

# The driver to use
driver = user.sdr
#cmd = rtl_433 -M utc -F json
cmd = rtl_433 -M utc -F json -f868.2M
path = /usr/local/bin/
log_unknown_sensors = True
log_unmapped_sensors = True

[[sensor_map]]
# Oregon WMR89
# windSpeed = wind_speed.0:215.OSWGR800Packet
# windGust = wind_gust.0:215.OSWGR800Packet
# windDir = wind_dir.0:215.OSWGR800Packet
# windBatteryStatus = battery.0:215.OSWGR800Packet
# outTemp = temperature.1:246.OSTHGR810Packet
# outHumidity = humidity.1:246.OSTHGR810Packet
# outTempBatteryStatus = battery.1:246.OSTHGR810Packet
# pressure = pressure.1:246.OSTHGR810Packet
# rainBatteryStatus = battery.0:122.OSPCR800Packet
# rainRate = rain_rate.0:122.OSPCR800Packet
# rain_total = rain.0:122.OSPCR800Packet

# Bresser 5in1 (new format)
windSpeed = wind_speed.541070586.Bresser6in1Packet
windGust = gust_speed.541070586.Bresser6in1Packet
windDir = wind_dir_deg.541070586.Bresser6in1Packet
outTemp = temperature_C.541070586.Bresser6in1Packet
outHumidity = humidity.541070586.Bresser6in1Packet
pressure = pressure.541070586.Bresser6in1Packet

[[deltas]]
rain = rain_total

Finishing Up

Finally, the default web page does not autorefresh. To make it easier to reload the page I made the station name in the masthead into a link to auto refresh script. Its like old school tapping a barometer to see if the pressure is falling. Although a lot can be configured through weewx.conf, this change has to be made in the skin. The default is located in /etc/weewx/skins/Seasons. The page index.html.tmpl calls  titlebar.inc to build the masthead. Wrapping a <a> element with some javascript around the relevant div gives the wanted effect:

....
<div id="title_bar">

<a HREF="javascript:history.go(0)">
<div id="title">
<h1 class="page_title">$station.location</h1>
<p class="lastupdate">$current.dateTime</p>
</div>
</a>
....

Setting up a headless Raspberry Pi.

I’m using a Pi Zero. These instructions show how to set it up without needing to connect a monitor or keyboard.

Configure the RPI

      1. On a Windows PC, use the RP imager software to format the SD card and burn an image. This will create two partitions on the card. One (called ‘Recovery’) can be browsed with Windows. The second partition cant be read with Windows. Leave it alone.
        https://www.raspberrypi.org/downloads/
      2. On Windows, using Notepad++, create a “wpa_supplicant.conf” file. This contains details of your WiFi network. It should be saved as a Unix file and copied to the root folder of the Recovery partition.
        network={
          ssid="my network name"
          psk="my network password"
          proto=RSN
          key_mgmt=WPA-PSK
          pairwise=CCMP
          auth_alg=OPEN
        }
      3. Create an empty file called “ssh.txt” and copy this to the root folder of the Recovery partition. This is a security precaution and tells the RP to enable SSH when it boots. Its not normally enabled as doing so without a password is a security risk.
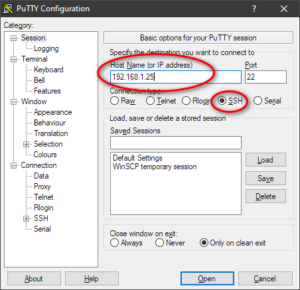
      4. On your PC install ‘Putty’. This is a simple GUI that gives command line access to the RP and allows setup to continue.:
        https://www.chiark.greenend.org.uk/~sgtatham/putty/latest.html
      5. Install the SD card in the Raspberry Pi and then, on your Windows box, use a browser to connect to your router and the IP address for the Pi.
      6. Start Putty and connect to the Raspberry Pi via SSH:
      7. A console window will open with the Raspberry Pi. Login – the default username/password is pi/raspberry. You will change this in a few minutes.

Editing system files on the  RPi

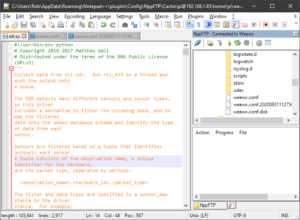
Putty will give you a quick and easy command line tool and you can use an editor like nano or vi, its much easier with a GUI editor. My preferred tool is to run Notepad++ with the NppFTP plugin. This gives you a tree view of the file system. Double click a file and it gets transferred to your workstation and opened in the editor. When you save it, it gets copied to the RPI ready to test via Putty’s console window.

    1. There is only one gotcha, the file protection some of the files you install may prevent you editing them as they may be owned by root, rather than yourself. Use sudo chmod o+w file.name to make them editable. In the case of Weewx you can recurse the file system using find to fix all relevant files. This should do the trick. It only needs to be done once.
      sudo su
      find /etc/weewx -exec chmod o+w {} \;
      find /var/www/html -exec chmod o+w {} \;

      GUI interface

    2. If you prefer, you can use a GUI interface to the RPi desktop.
      1. On your PC install Real VNC Viewer from:
        https://www.realvnc.com/en/connect/download/viewer/.
      2. Open a console window via Putty. Once logged on type: sudo raspi-config. This starts a simple menu system. Under ‘Interfaces’ enable VNC.
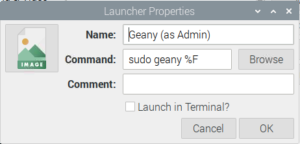
      3. You can now reboot the Raspberry Pi and connect via VNC to get a graphical interface. When you connect for the first time you will be prompted to change the password. I also change the screen resolution to 1280 x 720 and create a menu entry for the Geany editor running as admin: