We will use the following hardware:
- Raspberry Pi Zero wireless, Version 2
- Pirate audio amplifier
- Waveshare LCD1602 display
- Breakout board for Pi Zero
- Hardware & speakers from Pure Chronos CD player
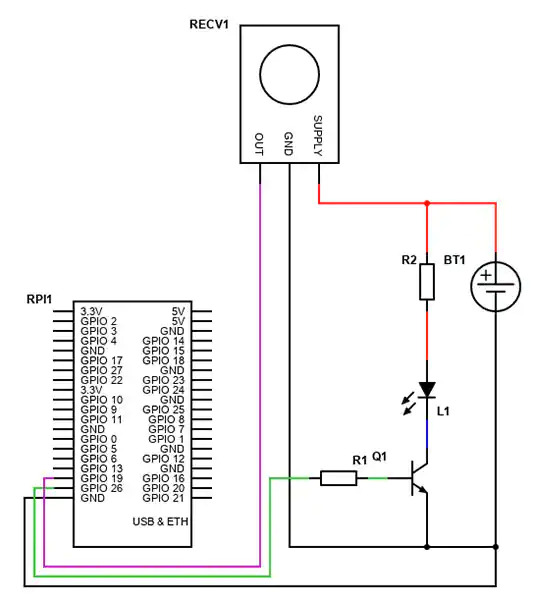
Need to check what pins are in use by various boards from pinout.xyz.
#02 5Vpower
#12 GPIO 18 I2S
#18 GPIO 24 Button (not needed)
#19 GPIO 10 LCD SPI Data
#22 GPIO 25 Amplifier enable
#23 GP10 11 LCD SPI (not needed)
#29 GPIO 7  LCD SPI CS (not needed)
#29 GPIO 5 Button A (not needed)
#31 GPIO 6 Button B (not needed)
#33 GPIO13  LCD Backlight (not needed)
#35 GPIO 19 I2S
#36 GPIO 16 Button X
#38 GPIO 20 Button Y Obsolete
#39 GPIO 21 I2S
For the 16 x 2 display we need power and the I2C interface. This can support more than one device, so no problems. Here are the connections
#01 +3.3V Power #03 GP1O 02 SCL #05 GP1O 05 SCL #09 GRND GroundRaspberry Pi Zero wireless, Version 2Pirate audio amplifierWaveshare LCD1602 displayBreakout board for Pi ZeroHardware & speakers from Pure Chronos CD player
Raspberry Pi Zero wireless, Version 2Pirate audio amplifierWaveshare LCD1602 displayBreakout board for Pi ZeroHardware & speakers from Pure Chronos CD player
Experiments with the display
Remove Pirate Audio board.
Make a Development ENvironment
We will be using virtualenvwrapper to create a workspace in a a virtual environment when working on mopidy. This isolates anything we do from the normal python environment. First of all make sure modpidy is not running:
sudo systemctl stop mopidyNow install virtualenvwrapper software:
sudo pip install virtualenvwrapperTo complete the install you will need to edit your .bashrc file and reload it to add the definitions to your default environment.
nano ~/.bashrc
# Add these 3 lines at the end of .bashrc and save
    export WORKON_HOME=~/Envs
    mkdir -p $WORKON_HOME
    source /usr/local/bin/virtualenvwrapper.sh
Finally, ‘source’ the file to load the definitions to your environment (or reboot):
source ~/.bashrcUseful commands when working with virttualenvwrapper are:
Create an environment for working on mopidy
You are now ready to create your environment for working on mopidy. You need to create a directory to work in and check which version of python you are running with and where it is located. Start looking under /usr/bin/ . In my case its python 3.9
# Determine which version of Python you are running:
ls /usr/bin/python*
/usr/bin/python   /usr/bin/python3.9         /usr/bin/python3-config
/usr/bin/python3  /usr/bin/python3.9-config

# Create the virtual environment
mkdir ~/mopidy_dev
cd modpidy_dev
mkvirtualenv -a ~/mopidy_dev --python $(which python3.9) \
          --system-site-packages mopidy
You are now ready to start installing software into your virtual environment.
Setup & Test Pirate AUdio
On Windows PC, use the Raspberry Pi imager to burn image to MicroSd card. We need to set it up for ‘headless’ operation so, in the settings cog set the following:
- Set hostname
- Enable SSH
- Set default username and password
- Configure Wireless LAN
Note first boot takes some time because it has to arrange the file system and do other housekeeping. Reboot and then install Pirate Audio using these instructions. This makes the nessesary changes to config.txt and installs a number of useful extensions such as:
- Mopidy – The core component for the system
- Mopdi-PiDi display driver (we wont be using this in the final system, but its useful for testing and hacking to provide a driver for the 16 x 2 display).
- Mopidy-Iris – Web based UI for driving the player from another computer
- Mopidy-Raspberry-GPIO – We will be replacing this with a hacked version of Mopidy-Headless when we come to implement the controls based on the Pure Chronois hardware.
The core Mopidy installer also installs the following bundled extensions:
- Mopidy-File
- Mopidy-M3U
- Mopidy-Stream
- Mopidy-HTTP
- Mopidy-SoftwareMixer
Here we use the Pirate Audio installer to setup Mopidy and various utilities so we can do a simple test of the system.
git clone https://github.com/pimoroni/pirate-audio
cd pirate-audio/mopidy
sudo ./install.sh
...
Use WinSCP to copy come music to your ~/Music folder. Instruct Mopidy to index the music folders.
sudo mopidyctl local scanReboot the system and test the installation. Using the browser on your PC, connect to iris on the RP and play some music:
http://192.168.1.20:6680/iris/Be sure to check out /etc/mopidy/mopidy.conf. This file contains the confuration used by mopidy. The pirate audio installer configures this to define which modules load, which actions the GPIO pins implement and where the mucic folder is located. Consult the detiled documentation to see how other configurations can be achieved.
The following copmmands can be used to start/stop the Modidy service from running. See also other commands to control Mopidy:
sudo systemctl enable mopidy
sudo systemctl start mopidy
sudo systemctl stop mopidy
sudo systemctl restart mopidy
sudo systemctl status mopidy   # Displays status & log info
mopidy --help
See this page for instructions on running mopidy from a terminal.
Populate workspace for use with Mopidy
First use the virtualenv command workon mopidy to switch to your development workspace and then clone a copy of mopidy sources from GitHub. Use the git branch command to check you are on a development branch. Finally cd to the mopidy folder and use the install script. NB There is no need to ‘sudo’ the commands this time as you are working in your own home directory.
sudo systemctl stop mopidy
..
workon mopidy
pwd
/home/pi/mopidy_dev
git clone https://github.com/mopidy/mopidy.git
...
cd ~/mopidy-dev/mopidy/
pwd
/home/pi/mopidy_dev/mopidy
...
git branch
* develop
pip install --upgrade --editable .
Next we’ll want to run Mopidy from the Git repo. There’s two reasons for this: first of all, it lets you easily change the source code, restart Mopidy, and see the change take effect. Second, it’s a convenient way to keep at the bleeding edge, testing the latest developments in Mopidy itself or test some extension against the latest Mopidy changes.
Assuming you’re still inside the Git repo, use pip to install Mopidy from the Git repo in an “editable” form:
pip install --upgrade --editable .export SETUPTOOLS_USE_DISTUTILS=stdlib
pip install --upgrade --editable .You now have an editable version of mopidy you can tinker with. You may like to test it by starting from the command line with the mopidy or mopidy--verbose option to see the full gory detail, or omit to see the shorter information (including which config file it is using).
mopidy
INFO     2022-07-19 16:29:58,577 [1632:MainThread] mopidy.__main__
  Starting Mopidy 3.3.0
INFO     2022-07-19 16:30:01,056 [1632:MainThread] mopidy.config
  Loading config from builtin defaults
INFO     2022-07-19 16:30:01,147 [1632:MainThread] mopidy.config
  Loading config from file:///home/pi/.config/mopidy/mopidy.conf
INFO     2022-07-19 16:30:01,170 [1632:MainThread] mopidy.config
  Loading config from command line options
INFO     2022-07-19 16:30:05,417 [1632:MainThread] mopidy.__main__
  Enabled extensions: iris, m3u, softwaremixer, http, pidi, file, local, stream
INFO     2022-07-19 16:30:05,421 [1632:MainThread] mopidy.__main__
  Disabled extensions: spotify, raspberry-gpio
WARNING  2022-07-19 16:30:05,428 [1632:MainThread] mopidy.__main__
  Found spotify configuration errors. The extension has been automatically disabled:
WARNING  2022-07-19 16:30:05,435 [1632:MainThread] mopidy.__main__
    spotify/username must be set.
WARNING  2022-07-19 16:30:05,440 [1632:MainThread] mopidy.__main__
    spotify/password must be set.
WARNING  2022-07-19 16:30:05,445 [1632:MainThread] mopidy.__main__
    spotify/client_id must be set.
WARNING  2022-07-19 16:30:05,451 [1632:MainThread] mopidy.__main__
    spotify/client_secret must be set.
WARNING  2022-07-19 16:30:05,458 [1632:MainThread] mopidy.__main__
  Please fix the extension configuration errors or disable the extensions to silence these messages.
INFO     2022-07-19 16:30:07,010 [1632:MainThread] mopidy.commands
  Starting Mopidy mixer: SoftwareMixer
INFO     2022-07-19 16:30:07,037 [1632:MainThread] mopidy.commands
  Starting Mopidy audio
INFO     2022-07-19 16:30:07,076 [1632:MainThread] mopidy.commands
  Starting Mopidy backends: LocalBackend, FileBackend, M3UBackend, StreamBackend
INFO     2022-07-19 16:30:07,225 [1632:Audio-2] mopidy.audio.actor
  Audio output set to "autoaudiosink"
INFO     2022-07-19 16:30:07,565 [1632:MainThread] mopidy.commands
  Starting Mopidy core
INFO     2022-07-19 16:30:07,715 [1632:MainThread] mopidy.commands
  Starting Mopidy frontends: PiDiFrontend, IrisFrontend, HttpFrontend
INFO     2022-07-19 16:30:07,743 [1632:IrisFrontend-9] mopidy_iris.core
  Starting Iris 3.64.0
INFO     2022-07-19 16:30:07,787 [1632:HttpFrontend-11] mopidy.http.actor
  HTTP server running at [::ffff:127.0.0.1]:6680
INFO     2022-07-19 16:30:07,791 [1632:MainThread] mopidy.commands
  Starting GLib mainloop
You will need to use Ctrl+C to stop it running.
Connect up display:
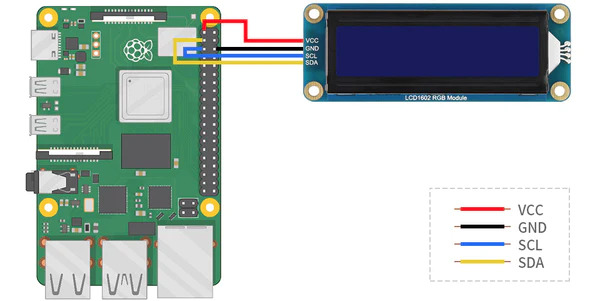
On your PC, download the Waveshare demo code and extract. Then copy across to the RPi to ~/LCD1602/. You will need to enable the I2C interface on the RPi:
sudo raspi-config
# Then Choose Interfacing Options -> I2C -> Yes  to enable I2C interface
You can now test the display by running one of the demo programs:
python Choose_Color.py Note the module RGB1602.py will need to be included in your programs.
Download the demo code from
cd ~
wget https://www.waveshare.com/wiki/File:LCD1602-RGB-Module-demo.zip
cd ~/LCD1602-RGB-Module-demo/Raspberry
sudo chmod 777 *
sudo python Choose_Color.py
sudo python Discoloration.py